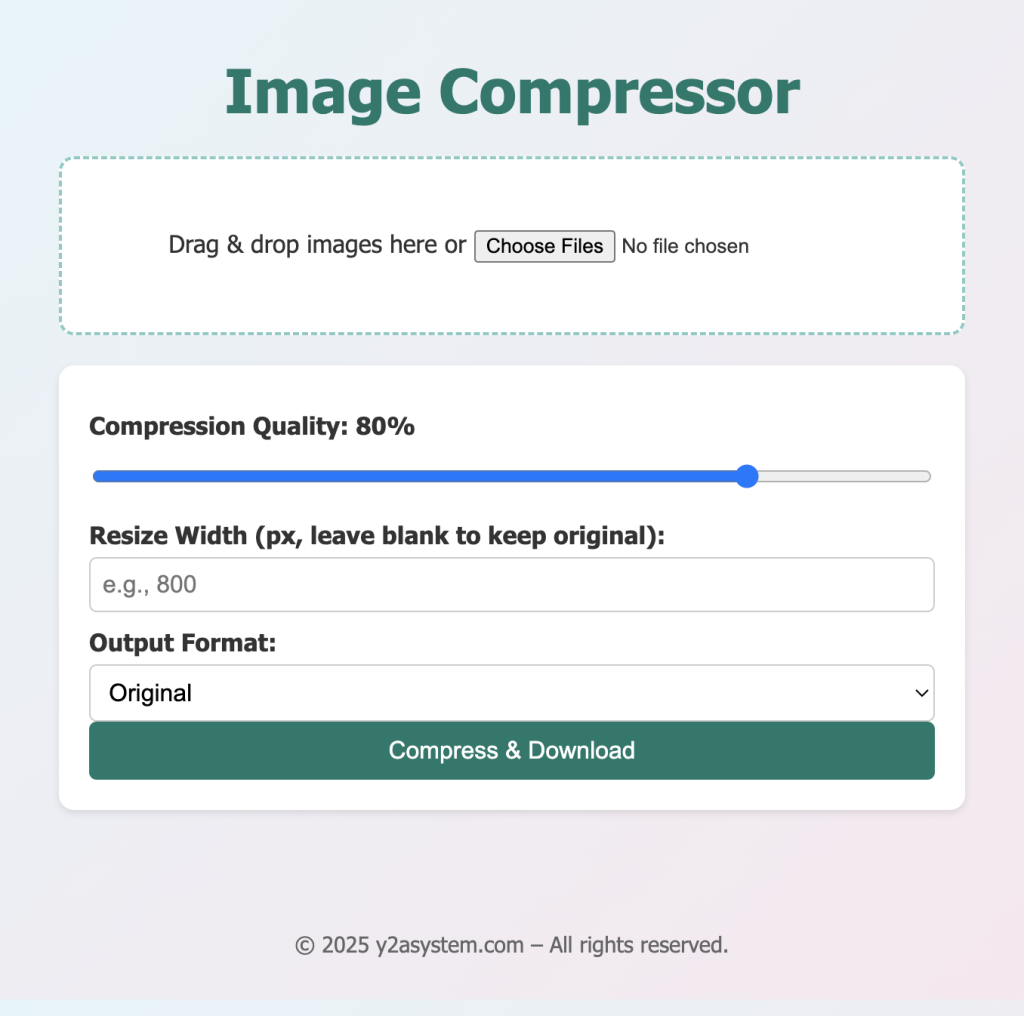
In today's fast-paced digital world, image optimization is essential for improving website speed, SEO, and user experience. Whether you're a developer, designer, or content creator, having a reliable image compressor tool at your fingertips can make a big difference.
In this tutorial, we'll walk through creating a feature-rich Image Compressor Web App using HTML5, CSS3, and JavaScript (ES6+) , complete with drag-and-drop uploads, adjustable compression, multiple output formats, image resizing, and real-time previews.
Features of the Image Compressor App Here’s what makes this app stand out:
✅ Drag & Drop Upload
Effortlessly upload images by dragging them into the designated area or selecting files using the file input.
✅ Adjustable Compression
Control image quality from 0% to 100% to balance clarity and file size using a dynamic slider.
✅ Multiple Output Formats
Save images in JPEG , PNG , WEBP , or keep the original format .
✅ Resize Images
Resize by width while maintaining the aspect ratio to fit specific layout or bandwidth needs.
✅ Real-Time Preview
See a preview of each image as soon as it's uploaded, ensuring you're working with the correct files.
✅ Batch Processing
Compress multiple images in one go, with the ability to reorder images by dragging.
✅ Progress Indicators
Track the progress of each image being processed with animated bars.
✅ File Size Comparison
Displays original vs. compressed file sizes, along with percentage reduction .
Technologies Used Technology Purpose HTML5 Structure of the web application CSS3 Styling with modern UI and animations JavaScript Core functionality and interactivity Canvas API Client-side compression and resizing
How it Works User uploads images via drag-and-drop or file browser.Images are previewed with thumbnails and file details.User selects compression quality , resize width , and output format . The app uses the Canvas API to compress and resize each image on the client side. Users download the optimized images , no server needed. Project Structure /image-compressor-app
├── index.html
├── style.css
├── script.js1.index.html <!DOCTYPE html>
<html lang="en">
<head>
<meta charset="UTF-8" />
<meta name="viewport" content="width=device-width, initial-scale=1.0" />
<title>Image Compressor App</title>
<link rel="stylesheet" href="styles.css">
</head>
<body>
<h1>Image Compressor</h1>
<div class="upload-area" id="upload-area">
<p>Drag & drop images here or <input type="file" id="file-input" multiple accept="image/*"></p>
</div>
<div class="controls">
<label for="quality">Compression Quality: <span id="quality-val">80</span>%</label>
<input type="range" id="quality" min="1" max="100" value="80">
<label for="resize">Resize Width (px, leave blank to keep original):</label>
<input type="number" id="resize" placeholder="e.g., 800">
<label for="format">Output Format:</label>
<select id="format">
<option value="original">Original</option>
<option value="image/jpeg">JPEG</option>
<option value="image/png">PNG</option>
<option value="image/webp">WEBP</option>
</select>
<button class="btn" id="compress-btn">Compress & Download</button>
</div>
<div class="preview" id="preview"></div>
<script src="script.js"></script>
</body>
</html>
2.style.css * {
box-sizing: border-box;
}
body {
font-family: 'Segoe UI', Tahoma, Geneva, Verdana, sans-serif;
display: flex;
flex-direction: column;
align-items: center;
padding: 20px;
background: linear-gradient(135deg, #e0f7fa, #fce4ec);
color: #333;
}
h1 {
font-size: 2.5rem;
margin-bottom: 20px;
color: #00796b;
}
.upload-area {
border: 2px dashed #80cbc4;
padding: 30px;
width: 100%;
max-width: 600px;
text-align: center;
background: white;
margin-bottom: 20px;
border-radius: 10px;
transition: background 0.3s;
}
.upload-area.dragover {
border-color: #004d40;
background-color: #b2dfdb;
}
.controls {
display: flex;
flex-direction: column;
width: 100%;
max-width: 600px;
margin-bottom: 20px;
background: white;
padding: 20px;
border-radius: 10px;
box-shadow: 0 2px 5px rgba(0, 0, 0, 0.1);
}
.controls label {
margin: 10px 0 5px;
font-weight: bold;
}
input[type="range"],
input[type="number"],
select {
padding: 8px;
border-radius: 5px;
border: 1px solid #ccc;
font-size: 1rem;
}
.preview {
display: flex;
flex-wrap: wrap;
gap: 20px;
margin-bottom: 20px;
justify-content: center;
}
.preview img {
max-width: 180px;
max-height: 180px;
border-radius: 5px;
box-shadow: 0 2px 5px rgba(0, 0, 0, 0.1);
}
.preview-item {
display: flex;
flex-direction: column;
align-items: center;
border: 1px solid #ccc;
padding: 15px;
background: #ffffff;
border-radius: 10px;
box-shadow: 0 4px 6px rgba(0, 0, 0, 0.05);
transition: transform 0.2s ease;
}
.preview-item:hover {
transform: translateY(-3px);
}
.btn {
padding: 10px 20px;
background: #00796b;
color: white;
border: none;
cursor: pointer;
border-radius: 5px;
font-size: 1rem;
transition: background 0.3s;
}
.btn:hover {
background: #004d40;
}
.file-stats {
margin-top: 10px;
font-size: 14px;
text-align: center;
}
.progress {
width: 100%;
background: #e0e0e0;
border-radius: 10px;
overflow: hidden;
margin-top: 10px;
}
.progress-bar {
height: 10px;
background: #00796b;
width: 0;
transition: width 0.5s ease;
}
footer {
text-align: center;
margin-top: 40px;
font-size: 0.9rem;
color: #666;
}3.script.js document.getElementById("year").textContent = new Date().getFullYear();
const uploadArea = document.getElementById("upload-area");
const fileInput = document.getElementById("file-input");
const preview = document.getElementById("preview");
const qualityInput = document.getElementById("quality");
const qualityVal = document.getElementById("quality-val");
const resizeInput = document.getElementById("resize");
const formatSelect = document.getElementById("format");
const compressBtn = document.getElementById("compress-btn");
let imageFiles = [];
uploadArea.addEventListener("dragover", (e) => {
e.preventDefault();
uploadArea.classList.add("dragover");
});
uploadArea.addEventListener("dragleave", () => {
uploadArea.classList.remove("dragover");
});
uploadArea.addEventListener("drop", (e) => {
e.preventDefault();
uploadArea.classList.remove("dragover");
handleFiles(e.dataTransfer.files);
});
fileInput.addEventListener("change", () => {
handleFiles(fileInput.files);
});
function handleFiles(files) {
[...files].forEach(file => {
if (!file.type.startsWith("image/")) return;
const reader = new FileReader();
reader.onload = () => {
const img = document.createElement("img");
img.src = reader.result;
const item = document.createElement("div");
item.className = "preview-item";
item.draggable = true;
item.appendChild(img);
item.file = file;
preview.appendChild(item);
imageFiles.push(item);
};
reader.readAsDataURL(file);
});
}
qualityInput.addEventListener("input", () => {
qualityVal.textContent = qualityInput.value;
});
compressBtn.addEventListener("click", async () => {
for (const item of imageFiles) {
const file = item.file;
const format = formatSelect.value === "original" ? file.type : formatSelect.value;
const quality = qualityInput.value / 100;
const resizeWidth = parseInt(resizeInput.value) || null;
const img = new Image();
img.src = URL.createObjectURL(file);
await img.decode();
const canvas = document.createElement("canvas");
const scale = resizeWidth ? resizeWidth / img.width : 1;
canvas.width = resizeWidth || img.width;
canvas.height = img.height * scale;
canvas.getContext("2d").drawImage(img, 0, 0, canvas.width, canvas.height);
const blob = await new Promise(resolve => canvas.toBlob(resolve, format, quality));
const downloadLink = document.createElement("a");
downloadLink.href = URL.createObjectURL(blob);
downloadLink.download = `compressed-${file.name}`;
downloadLink.click();
}
});Why Client-Side Compression? No need to upload images to a server – faster and more secure. Keeps sensitive images private. No backend or database required. Final Thoughts Building your own image compressor app is a great way to learn about:
The Canvas API for graphics and image manipulation Drag-and-drop file handlingFile compression and format conversion Creating a smooth user interface and experience This app is fast, flexible, and perfect for developers who want a lightweight alternative to online compressors.
VIEW DEMO