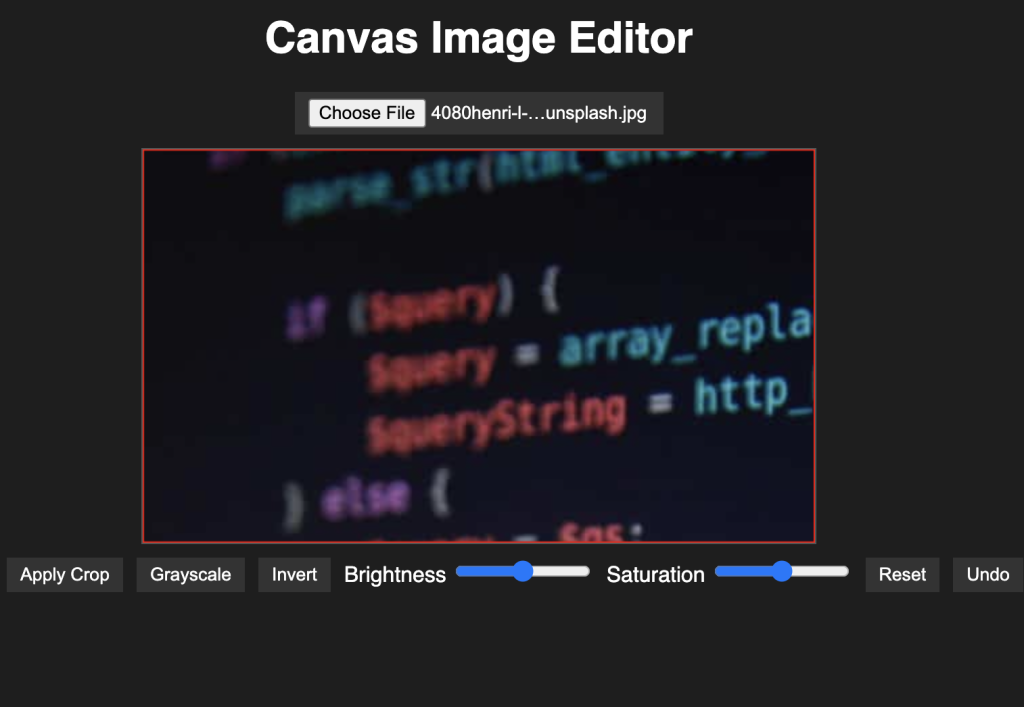
Image editing is a powerful feature to include in web applications, and with the HTML5 Canvas API and a bit of JavaScript, we can create a simple yet robust image editor. In this blog post, we'll walk through building a fully functional canvas-based image editor that allows users to upload images, crop them, apply filters, adjust brightness and saturation, and even use undo/redo functionality.
Features Overview
Our image editor includes:
- Image Upload
- Cropping Tool (drag-select)
- Rotate (90-degree increments)
- Filters (grayscale, invert)
- Brightness & Saturation Adjustment
- Undo/Redo Stack
- Export Functionality (save as PNG)
Tools and Technologies Used
- HTML5
<canvas> - JavaScript (vanilla)
- CSS (basic layout and styling)
Step-by-Step Breakdown
1. Setting Up the HTML Structure
We begin with a simple structure: a canvas, an upload button, and controls for editing.
<input type="file" id="upload" accept="image/*">
<canvas id="canvas"></canvas>
<div class="controls">
  <button onclick="rotateImage()">Rotate</button>
  <!-- Additional controls here -->
</div>
2. Upload and Display an Image
Using the FileReader API, we load an image from the user's device and draw it to the canvas.
upload.addEventListener('change', (e) => {
  const file = e.target.files[0];
  const reader = new FileReader();
  reader.onload = () => {
    const img = new Image();
    img.onload = () => {
      canvas.width = img.width;
      canvas.height = img.height;
      ctx.drawImage(img, 0, 0);
    };
    img.src = reader.result;
  };
  reader.readAsDataURL(file);
});
3. Cropping Feature
Users can click and drag to select a rectangular area. Once selected, pressing the "Crop" button extracts the region and redraws it.
function applyCrop() {
  const { x, y, w, h } = getCropArea();
  const cropped = ctx.getImageData(x, y, w, h);
  canvas.width = w;
  canvas.height = h;
  ctx.putImageData(cropped, 0, 0);
}
4. Filters and Adjustments
We manipulate pixel data directly for filters like grayscale and invert. Brightness and saturation are applied by altering RGB channels accordingly.
function applyFilter(type) {
  const imageData = ctx.getImageData(0, 0, canvas.width, canvas.height);
  // Loop through and modify pixel data...
  ctx.putImageData(imageData, 0, 0);
}
5. Undo/Redo Functionality
We use a stack-based approach to allow undoing and redoing edits.
function saveState() {
  undoStack.push(ctx.getImageData(0, 0, canvas.width, canvas.height));
}
6. Exporting the Image
Finally, users can save their edited image as a PNG file.
function exportImage() {
  const link = document.createElement('a');
  link.download = 'edited-image.png';
  link.href = canvas.toDataURL();
  link.click();
}
Final Thoughts
This project showcases how powerful the Canvas API is for building image manipulation tools directly in the browser. With some creativity, you can expand this basic editor into a full-fledged image editing suite.